The word "personal" in personal computers should really attest to its purpose- to read the user's qualities and give corresponding feedback. Now, there seems to be devices that can literally read you. I read a paper published by the MIT media lab- "Capturing Individual and Group Behavior withWearable Sensors." The paper introduced a study that involved the sociometer and its reading of 67 nurses at a hospital in Boston. The sociometer recorded interactive information such as speech activity, face-to-face interaction, and physical activity. An accelerometer would read the individual's physical movements, and voice frequencies would recognize and analyze speech. Interactivity would be indicated by the interaction of two sociometers from 2 individual or by an individual's proximity to inanimate objects such as the phone or bed.
The results showed enough correlations to prove that sensor data can define personal traits and characteristics. It was interesting to see how people can be identified just based on physical qualities in relation other objects and humans. The data only had partial contextual references (based on one of the studies done in a setup) and barely incorporated the content of individual's thought process or conversations with others. This paper shows that perhaps the computer does not need intricate and overly complicated analysis of users to create an environment adapted for the user. More information must entail higher replica of the user's mind; however, raw sensor data could be sufficient to read human traits that are to some degree categorized.
Source:
"Capturing Individual and Group Behavior withWearable Sensors"
http://pubs.media.mit.edu/pubs/papers/AAAI2009_Human_Behavior_Modeling.PDF
Friday, December 17, 2010
Wednesday, December 15, 2010
Functional Prototype
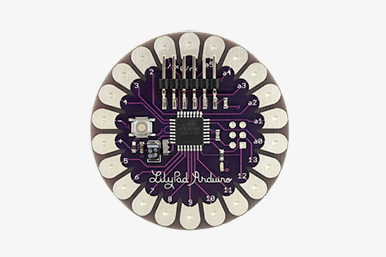
The functional prototype took a dramatic turn from the previous plans. The biggest decision was to replace the breadboard with the Arduino Lilypad, which was more apparel-friendly appearance and weight wise. Alex began programming and assigning the different components on the suit to pins. Organizing the conductive thread paths was truly a challenge- after some labor for planning and hours and hours of sewing, the threads created a beautiful design pattern on the suit. I've never done so much sewing in my life, and my sewing skills have definitely improved after this experience.

My primary job was to design and construct a skirt that would complement the suit. I wanted the skirt to be architectural and voluminous- because we were envisioning the final product to be on a runway, appearance and design quality were great priorities. Using strips from reflective silver paper used to create Christmas bows with lots of double-sided tape, I created chunks of curved planess.
After creating a significant number of "bubble planes" to wrap up the body, I used the chicken wire to build a voluminous support. To enforce volume and architectural dimension to the skirt, I needed a stable wire support, and the chicken wires were light and malleable enough to work with.
Because the skirt was to be a "wearable" component, it had to adjustable to various waist sizes. I sewed in a velcro belt so the skirt would unwrap and provide a more feasible wearability. After constructing the chicken wire mold, I used the glue gun to attach the bubble planes. It was great that the material for the planes was easily bendable- I bent the planes to accomodate and create curves and the glue gun melted the metal paper right into the wires.
 The final product complemented the suit very well. The silver gradients matched the white suit with the gray conductive thread patterns and accentuated the futuristic fashion. One warning was to prevent the wires from touching the threads.
For the final presentation, we made sure the threads were sealed with fabric paint and the LEDs were well connected.


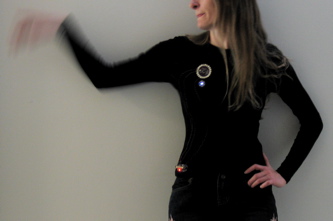
The functional prototype looked awesome! Unfortunately, the bluetooth was having trouble because of the low power supply, and the LED panel simply refused to listen to the computer commands. Also, the beautiful thread design made the stretchy suit not so stretchy, making the fitting really difficult.

The project needed a follow-up. After the presentation, the group gathered one more time to troubleshoot the LED panels, not through the bluetooth, but directly with the computer. The LEDs were controlled by their coordination and gave a great visual impact.


The bubbles, once lighted up, were beautiful attractions. The videos below show demonstrations for the panel and the bubbles.
Bubble Pop Electric was truly an exciting project. I learned so much about wearable, tangible interfaces and gained so much insight about the structure of the arduino lilypad and its endless functionalities. It was extremely rewarding to see the LEDs highlight the suit, and I hope I could extend my knowledge and experience to create more engaging and powerful interactive tools in the future.

My primary job was to design and construct a skirt that would complement the suit. I wanted the skirt to be architectural and voluminous- because we were envisioning the final product to be on a runway, appearance and design quality were great priorities. Using strips from reflective silver paper used to create Christmas bows with lots of double-sided tape, I created chunks of curved planess.
After creating a significant number of "bubble planes" to wrap up the body, I used the chicken wire to build a voluminous support. To enforce volume and architectural dimension to the skirt, I needed a stable wire support, and the chicken wires were light and malleable enough to work with.
Because the skirt was to be a "wearable" component, it had to adjustable to various waist sizes. I sewed in a velcro belt so the skirt would unwrap and provide a more feasible wearability. After constructing the chicken wire mold, I used the glue gun to attach the bubble planes. It was great that the material for the planes was easily bendable- I bent the planes to accomodate and create curves and the glue gun melted the metal paper right into the wires.


 The final product complemented the suit very well. The silver gradients matched the white suit with the gray conductive thread patterns and accentuated the futuristic fashion. One warning was to prevent the wires from touching the threads.
For the final presentation, we made sure the threads were sealed with fabric paint and the LEDs were well connected.


The functional prototype looked awesome! Unfortunately, the bluetooth was having trouble because of the low power supply, and the LED panel simply refused to listen to the computer commands. Also, the beautiful thread design made the stretchy suit not so stretchy, making the fitting really difficult.

The project needed a follow-up. After the presentation, the group gathered one more time to troubleshoot the LED panels, not through the bluetooth, but directly with the computer. The LEDs were controlled by their coordination and gave a great visual impact.


The bubbles, once lighted up, were beautiful attractions. The videos below show demonstrations for the panel and the bubbles.
Bubble Pop Electric was truly an exciting project. I learned so much about wearable, tangible interfaces and gained so much insight about the structure of the arduino lilypad and its endless functionalities. It was extremely rewarding to see the LEDs highlight the suit, and I hope I could extend my knowledge and experience to create more engaging and powerful interactive tools in the future.
Tuesday, December 14, 2010
"Peg Mirror" - Interactive wood pieces
The "Peg Mirror" by Daniel Rozin contains 650 wooden pieces with 650 motors. There is a camera positioned at the center of the mirror, and it reads whatever shows up in front of it and breaks down the image into "pixels."
It would be like dividing up an image into areas and assigning/painting them with certain degrees of darkness. This interactive art piece beautifully mashes organic materials with digital media. It works well as a wood sculpture/installation and also functions as a decorative "mirror" on the wall. The interactivity brings the piece beyond that of just a static installation and creates an active and constantly morphing- almost living object. The reading and adjusting are incredibly smooth, and the moving surface creates beautiful ripples. It reflects the movement of nature while appearing like a highly manufactured piece of work.
3D Printer Craze
The engineering lab at Wellesley has a 3-D printer. I remember watching a television show that first introduced me to a 3D printer that models an object, a human head, and a digital drawing and "prints" out a 3-dimensional replica. The experience was truly shocking and fascinating, and I really wanted to learn how the 3-D printer works.
According to Stratasys, the printer builds the product from the bottom up with acrylonitrile butadiene styrene plastic. The plastic is rigid and tough; it fits easily into molds. However, it remains to be very light and makes it the perfect material to construct pipes and golf club heads.
The software reads the STL file and builds the support structure. The plastic is melted into a semi-liquid state and builds the model in layers. This process is called "additive manufacturing."
There are different methods to printing a 3-D object:
- inkjet printing: powder layer with ink boundaries
- digital light processing: exposing liquid polymer to light
- 3D microfabrication: gel cut with laser
These are some examples of 3D print works:
Bathsheba Grossman
 KLAD
KLAD
 Iron Man 2 Suit modeling

There are so many ways you can implement the 3-D printer: art work, sculpture, miniature sets, costumes...
According to Stratasys, the printer builds the product from the bottom up with acrylonitrile butadiene styrene plastic. The plastic is rigid and tough; it fits easily into molds. However, it remains to be very light and makes it the perfect material to construct pipes and golf club heads.
The software reads the STL file and builds the support structure. The plastic is melted into a semi-liquid state and builds the model in layers. This process is called "additive manufacturing."
There are different methods to printing a 3-D object:
- inkjet printing: powder layer with ink boundaries
- digital light processing: exposing liquid polymer to light
- 3D microfabrication: gel cut with laser
These are some examples of 3D print works:
Bathsheba Grossman
There are so many ways you can implement the 3-D printer: art work, sculpture, miniature sets, costumes...
Friday, December 3, 2010
How to create a LED matrix
The Bubble Pop Electric team loves LED lights. I believe a performance outfit attracts best when it illuminates in darkness and follows the dynamic of the excited crowd. After deciding to use the Lilypad arduino, it was essential that we learn the skeletal blueprint of a LED matrix on fabric and the installation process while contemplating on the function of the arduino.
The team faced one of the greatest challenges when planning the distribution of the Lilypad's pins. Because the Lilypad needed to connect to the bubbles as well as the power source and the bluetooth, it could only provide 8 pins for our grand panel of around 50 LEDs. Our initial plan to control each LED was cancelled. Also, the price of the LED reduced the numbers for the panel. The 8 pins would have to accomodate for both column and row, meaning that the grid will eventually be 4x4. Technically, a 4x4 grid would only handle 16 LED, but to accentuate the brightness of the suit, the team decided to assign 2 LEDs to every crosspoint so that the suit will eventually carry 16x2=32 LEDs. The below picture shows what the suit with the sewn panel looks like.

The team faced one of the greatest challenges when planning the distribution of the Lilypad's pins. Because the Lilypad needed to connect to the bubbles as well as the power source and the bluetooth, it could only provide 8 pins for our grand panel of around 50 LEDs. Our initial plan to control each LED was cancelled. Also, the price of the LED reduced the numbers for the panel. The 8 pins would have to accomodate for both column and row, meaning that the grid will eventually be 4x4. Technically, a 4x4 grid would only handle 16 LED, but to accentuate the brightness of the suit, the team decided to assign 2 LEDs to every crosspoint so that the suit will eventually carry 16x2=32 LEDs. The below picture shows what the suit with the sewn panel looks like.

The LED matrix requires tricky sewing. Using the conductive thread, the rows can't be touching the columns for a successful circuit. Ali used the sewing machine using a line of conductive thread and another line of non-conductive white thread- the rows are sewed from the surface and the columns are sewed from the inside. The suit has two layers of fabric. When sewn to the first layer, the non-conductive thread will create a buffer between the layers of the suit and prevent the columns and rows touching. It was a risky and careful undertaking. After the matrix is completed, LEDs with curled legs with bridge the column and the row to create a full circuit.
Monday, November 29, 2010
Dress Design Inspirations
Though machines and technology suggest advancement in speed and efficiency, humans still remain visually active. It may be convenient for a machine to work so diligently, but if the appearance is distasteful, interest, attention, and even usability are lost. Especially designs for human-computer interaction should cater to human taste and visual attractiveness since they intend to stay in close contact with humans.
Bubble Pop Electric is a functional suit; however, it is also an outfit designed for audience to see and enjoy. While focusing on technological design and functionality, apparel design also stands as a critical component. The suit's design concept contains adjectives such as shear, light, bubbly, transparent, and luminous; the skirt that is attached to the functional suit should also reflect the descriptions.
Tara Donovan creates beautiful art works with repeated taping and stacking of stationaries. The below pictures depict the group's inspirations for a skirt with recurring patterns and bubbly lightness.

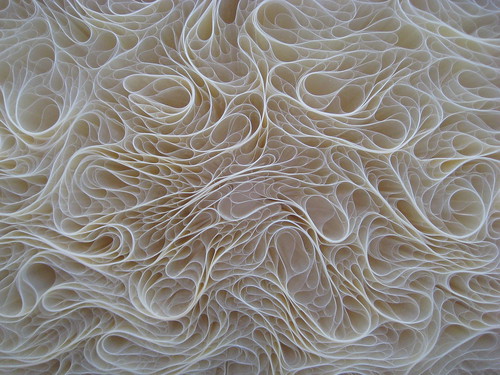
To create a skirt with dimensional and repetitive elements, I played different types of materials: aluminum tape, sparkly paper, etc and ended up finding reflective papers used to create Christmas ribbons. The below picture shows the prototype of the skirt/decoration made up of layers of tear-drop shaped paper strips. The challenges for the skirt include skillfully manipulating the paper to complement the shape of the body while accentuating the nature of our very bubbly and light suit.

Monday, November 22, 2010
Evocative Objects
Personal Essay
College increased my appreciation for family. The longer I attended school, the more I valued the time I could spend with my family during the breaks. I longed to find a memory piece that would remind me of them and help me feel connected and secure. During the summer after my first year at Wellesley, my mom gave me one of her rings. It served as a tangible memory of my family, especially of my mother. The ring was bought and given to my mother by her mother who was preparing jewelry for one of her sons’ wedding. It is Korean tradition for the in laws on the husband’s side to prepare gifts for the bride. My mother who tagged along for the shopping luckily was rewarded with a beautiful ring.
College increased my appreciation for family. The longer I attended school, the more I valued the time I could spend with my family during the breaks. I longed to find a memory piece that would remind me of them and help me feel connected and secure. During the summer after my first year at Wellesley, my mom gave me one of her rings. It served as a tangible memory of my family, especially of my mother. The ring was bought and given to my mother by her mother who was preparing jewelry for one of her sons’ wedding. It is Korean tradition for the in laws on the husband’s side to prepare gifts for the bride. My mother who tagged along for the shopping luckily was rewarded with a beautiful ring.
The ring bears great meaning beyond that of a newly defined heirloom. With the ring comes my mother’s youthful memory, of times that she herself was my age. The ring wraps around my finger and elicits imagination of times that are personal to one of my family. It is a privilege to be assigned the task to remember and vicariously envision my mother’s memory. It is also a reminder of the time that has been passed on to me and will pass on to the next generation.
The ring’s rather unconventional design, with two ends of a gold piece never coming to full circle but ending in two opposite directions, transcends convention. It is a unique construction that overcomes traditionalism and still maintains to be beautiful. Also, due to its structural orientation, the ring's size easily adapts to its new owner. The attitude depicts not only my grandmother's unique and exceptional taste, it represents the openness for creativity, acceptance, and adaptability. The ring empowers me to be bold, different, and confident about myself, and every time I look at it, it inspires me to be creative and exceptional in whatever I do.
 After generations, the ring's value is independent of the original monetary price but increasingly dependent on the memory and empowerment accumulated through the experience. I am really thankful for the comfort and strength I receive from this special object, and I am always excited about the new memories it will take on.
Designer Statement


The ring’s rather unconventional design, with two ends of a gold piece never coming to full circle but ending in two opposite directions, transcends convention. It is a unique construction that overcomes traditionalism and still maintains to be beautiful. Also, due to its structural orientation, the ring's size easily adapts to its new owner. The attitude depicts not only my grandmother's unique and exceptional taste, it represents the openness for creativity, acceptance, and adaptability. The ring empowers me to be bold, different, and confident about myself, and every time I look at it, it inspires me to be creative and exceptional in whatever I do.

Designer Statement
Ideas often come from collaboration. My object is designed to depict this very belief and prove the power in cooperation. The object by itself is an awkward and undefined piece of two dimensional shape. However, when it is multiplied and matched against each other, it creates a pattern that expands into a holistic, brand new identity. The new creation is an inspiration and encouragement for thinkers to always be open to the surrounding space. By molding an idea to complement and adapt to another, one gains the possibility to create something with far greater conceptual and social advantage. And the puzzle never ends. The borders will always be open to more additions and growth and seek to become greater and more united.
Friday, November 12, 2010
Bubble Pop Electric P2 Documentation


Materials were of greatest importance in beginning the prototype. We purchased clear plastic Christmas ornaments to represent the bubbles and silver fabric for the bodysuit. After tracing the pattern, we proceeded to assemble the suit with liquid stitch.

Though the Christmas ornament appeared a lot like bubble, it concerned us that the clarity overly exposed the LED embedded in the bubble. So we experimented with different ways to alter the opacity of the bubble's surface. Above is a picture of the process I went through to the coat the bubble with layers of spray paint.


Alex programmed the pico block and the pic logochip (with bluetooth) so that the music's volume and LED's intensity would vary according to changing degrees of the potentiometer. Also, she added a slider that controlled the rate of the music.


Using the laser cutter, we created a plastic base for the bubble. The finished bubble was sewed on the bodysuit.


After the presentation in class, the group was left with many more questions and issues to discuss. First of all, the flat plastic surface of the bubble was too bulky and heavy on the suit. We discussed getting rid of the plastic ornament and replacing it with wires wrapped with thick vinyl. The wires stemming from the potentiometer and the LED were also possible concerns if we were to have more than bubble across the bodysuit.
We also had to reevaluate the slider's purpose. Though the effect was musically interesting, we needed more control (if it were to read the body movement) and a comprehensive point to having bodily movement affect the sound.
In the future, the bubbles should be designed to be lighter with clearly assigned roles and entities. Also, the LED panel would require many more discussions especially in terms of LED coordinates and sequence.
Tuesday, November 9, 2010
Friday, October 29, 2010
TangibleStories Brainstorming
For HW2, I have to design a tangible interface that allows people to share photos, videos, and text. I am using the Microsoft Surface SDK to construct this tui.
Requirements
- at least four different surface controls
- two physical objects (tags)
- display photos, text, video
Hand in
- project files
- readme file (Reality-based interaction, Tangible Interaction themes)
- photos of pyhsical objects
- 30-60 seconds video
Prototype
User scenario:Tupelos (Wellesley College a cappella) members are on a Tupie retreat. While hanging out, they bring up TangibleStories to look at videos, pictures, and lyrics of songs they sang and talk about great memories from the past. One of the members picks up a Musical Note tag to play a list of videos. They listen to performances and look at the choreographies; Tupies pick up the dance moves and entertain the other members.
Important Notes
Reality-Based interaction:
- Naive Physics
- Body Awareness & Skills
- Environment Awareness & Skills
- Social Awareness & Skills
Source: "Reality-Based Interaction: A Framework for Post-WIMP Interfaces"
by Rober J.K. Jacob, Audrey Girouard, Leanne M. Hirshfield, Micael S. Horn, Orit Shaer, Erin Treacy Solovey, Jamie Zigelbaum
Tangible Interaction Themes:
- Tangible Manipulation: tactile qualities
- Spatial Interaction: movement in "real space"
- Embodied Facilitation: material objects, space's effect on group behavior
- Expressive Representation: material and representation expressiveness and legibility
Source: "Getting a Grip on Tangible Interaction: A Framework on Physical Space and Social Interaction"
by Eva Hornecker, Jacob Buur
Friday, October 22, 2010
Tangible Kindergarten for Children by Professor Marina Bers
Associate Professor Marina Bers from the Eliot-Pearson Department of Child Development and the Computer Science Department at Tufts University visited Wellesley to give a talk on Tangible Kindergarten for Children. She emphasized the need for education to include a curriculum centered around robotics and engineering to insure that kids, who nowadays grow up surrounded by machines and advanced technology, learn and understand their interactive space. Because society has changed to an extent we often find ourselves depending so heavily on daily tools and gadgets we can't individually construct, it is essential that students are taught to at least understand the concepts behind the complicated manufacturing in our surrounding.
The interviews and video clips on the performance of children who experimented with the robotic kit were a fascinating testimony to how engineering can be an intuitive and natural part of learning. Kids, in the short period of 20 hours, were not only able to build and program robots but also integrate their new learning with their life stories. Computer science is no longer an extension from math and physics, but it rather becomes another fundamental study in life that will help people engage with the way their society is literally constructed. I was really impressed and even jealous of the length of exposure these children had to the world of technology that I am only beginning to understand. It almost seems now that such advancement in the education system is an inevitable part of change.
I am curious to know what more changes are being implemented in the kit to improve the transition between GUI and physical toys. I certainly do not want kids to be overpowered by computer screens. They should be taught to take control of their learning kits and learn to summarize the bigger picture of the tools they are exposed to.
VideoPlay: Multi-Touch Video Editing
While exploring through publications from Microsoft Research, I came across another TUI design for video editing. Stuart Taylor, Shahram Izadi, Kursat Ozenc, and Richard Harper devised VideoPlay, a TUI that functions on the Microsoft Surface platform and allows interactive manipulation and editing of video clips mainly from mobile devices. This device encourages fluid transitions and collaboration between physical objects, such as physical tiles that can map a video on the surface and connect with each other, and the digital effects that execute many of the editing process.


Source: http://research.microsoft.com/pubs/80351/VideoPlay.pdf
The tiles are designed to lock with each other to signify transition, and this action is read by the surface to produce a preview. The user can also attach tiles that symbolize certain effects literally on to the video clips.
The user can also directly manipulate the videos with touch. By sliding a tile while holding on to one end, the video unravels into a sequence, and the user can literally crop scenes by slashing one's finger through them.
VideoPlay successfully integrates the touch manipulation provided by a tabletop and the physicality of tile objects to produce an intuitive video editing system. I am interested in learning more about the TUI; for instance, I'm curious what kind of effects one can add to the videos. Overall, VideoPlay provides a beautifully designed tangible surface that is intuitive to users. I hope to see more development on the project such as additions of sound and visual editing.
Source: http://research.microsoft.com/pubs/80351/VideoPlay.pdf
Thursday, October 21, 2010
Moritz Waldemeyer
Moritz Waldemeyer is a contemporary designer who explores and combines fashion and technology to construct beautifully engineered art works. Here are some images of his work. This will serve as factors of motivation and inspiration for the aesthetic aspect of Bubble Pop Electric.


Waldemeyer's design works not only signify the beauty of skillful manipulation of light engineering but also promotes practicality of these futuristic products. They sometimes serve as extremely attractive and alluring performance outfits and other times become modes of effective communication and advertisement. His products are a true inspiration for the team, and I wish to concentrate more on the aspect of appearance as a superhero also looks good in his/her outfit.
Source: links found at http://www.waldemeyer.com/PROJECTMENU.html
Airborne video dress carrying 15,000 LEDs (wow) and displaying video sequences (collaborative work with Hussein Chalayan)
One Hundred and One (collaborative work with Hussein Chalayan)
Rhianna's Laser Outfit for the Grammy's
Heartbeat
Waldemeyer's design works not only signify the beauty of skillful manipulation of light engineering but also promotes practicality of these futuristic products. They sometimes serve as extremely attractive and alluring performance outfits and other times become modes of effective communication and advertisement. His products are a true inspiration for the team, and I wish to concentrate more on the aspect of appearance as a superhero also looks good in his/her outfit.
Source: links found at http://www.waldemeyer.com/PROJECTMENU.html
Pygame
Alex from the Bubble Pop Electric team suggested Pygame to program the music suit, so I explored a little bit with the coding.
Pygame provide python modules that can be constructed to create multimedia games. The music module provides a set of commands of audio that could be useful for reading the manipulations on the suit.
pygame.mixer.music.load(filename): return None
This command will load the audio indicated. This action should be executed when a music bubble is turned on. However, the drawback is that it will stop the clip already playing, and we need a system that can play multiple tracks at once.
pygame.mixer.music.get_pos(): return time
The get_pos command returns the time the music has been playing for. This value is useful to position additional music clips that will have to sync with the music that is already playing. For example, if the tempo of the music is indicated to have measures that are 4 seconds each, the additional clip that is activated by the player can be programmed to come in at the nearest time characterized by multiples of 4. If the user plays a beat bubble while a main song is playing, the computer calculates the main music's time by using:
pygame.mixer.music.get_pos(): return time
If the return value is divisible by four, the beat music will play immediately through
pygame.mixer.music.play(loops=0, start=0.0): return None
If it is not divisible by three, the computer retrieves the value of the remainder, subtract that number from 4, wait for that many seconds and then play the clip.
This scenario is highly theoretical, but this study will hopefully help me visualize the programming aspect of the TUI.
Source:
http://www.pygame.org/news.html
http://www.pygame.org/docs/ref/music.html
Building LED Shirt Reactive to Motion: Using LilyPad
These are some of the materials needed for the construction:
LilyPad Arduino Main Board, power supply (we are planning on using batteries that are going to be part of the stretch suit), USB Link, accelerometer, conductive thread, LED, digital multimeter, needle, fabric paint, fabric glue, needles, puffy fabric paint, etc.
Procedure:
1. Stitch the LilyPad and the power supply on the garment (make sure they remain in close distance for strong connection).
2. Mount the accelerometer and LED (seal knots with fabric glue).
3. Insulate power lines with puffy fabric paint (we may just attach another layer of fabric on top of the LED panel to create an illuminating effect).
4. Program the Arduino software (my team may program the LilyPad to react to the music playing).

Some ideas for programming
- LED reacts to the bass of the music
- LED reacts to the loudness of the music (using sound sensors)
- LED generates graphics pre-programmed for each beat sequence or main music
In order for the LED panel to generate graphics, each LED needs to be constructed into a grid system or an array. It needs to be identified based on its location, and each LED will be instructed independently.The problem with this task is that each LED would have to be connected to the LilyPad separately, and I'm afraid it won't provide sufficient ports. Also, translating the sensors may be a challenge because reading music requires skills to identify amplitude and timing.
Source: http://web.media.mit.edu/~leah/LilyPad/build/accelero_shirt.html
Thursday, October 14, 2010
P1 Conceptual Design Summary
Use scenario:
Stefani is a young DJ/entertainer, and she is looking for a new way to present music. She decides to wear Bubble Pop Electric to a party. She enters the stage-nervous. She switches one of the main beat bubbles. She twists it to adjust the volume, and she then turns a main music bubble to start the main song. The LED panel on the body suit displays animation following the music. As the crowd gets excited, she turns on her beat shoes and begins stomping. The stomp shoes accelerate the bass of the music every time the shoes hit the ground, and the LEDs on the shoes react to her stomping. Stefani feels more comfortable on stage, so she begins dancing. The suit reads the capacitance and creates a whammy bar effect on the music. With LEDs flashing all over the body along with Stefani's cool music mash, the crowd is more excited than ever.
Storyboard: This is Stefani's story

Sketches:

The sketch accommodates changes made based on class discussion. The team decided to eliminate the hat due to its lack of tie to the main suit and a clear purpose. Also, instead of providing a sash as an active space, we decided to keep the bubbles in designated areas. This reduces the danger of bubbles falling everywhere and confusion over the location of bubbles. The area where the sash is to be replaced with a LED panel that will display visuals based on the music playing. We are also planning to add a belt with on-and-off switches+sliders for the beat shoes and the LED panel. Overall, the main compositions of Bubble Pop Electric includes:
1. Stretch sensor suit+LED panel: the stretch sensors located on the sides will measure the capacitance of the user's movement and create whammy bar effects according to the movement. The LED panel will display animation based on music playing.
2. Music bubbles: The music bubbles are designated in four different areas of the body-right and left shoulders and right and left hip/thighs. Each designation carries a main, beat, and sample music and you may turn them on my twisting them. Once activated, the LED lights in the bubbles will light up.
3. Beat shoes: The beat shoes are embedded with vibration sensors. They will react whenever the user stomps. This will translate into acceleration of the bass and also LED lights turning on.
(Also, there will be a belt to turn the devices on and off.)
Low-fidelity prototype:
This is the video of the demonstration we did in class with our low-fidelity prototype.
And the following is a screen shot of the GarageBand composition used for the demo.

Wednesday, September 29, 2010
The Bubblegum Sequencer - Making Music With Candy
While looking for inspirations for the group project, I came across this brilliant and intuitive TUI music device. The Bubblegum Sequencer uses a grid that reads "gumballs" that are associated with different beats or special effect sounds. By manipulating and reorganizing the balls on the grid, the user can easily create various sequence of beats. The TUI allows a direct, visual approach to composing music.
A camera is located under the grid to recognize the gumball placements. Once the computer connected to the camera detects the positioning and color of each ball, it reads their sequence and identity and plays them accordingly.
This unique device introduces a grid system that can help us arrange our music bubbles. Sequencing music clips and connecting them under a united rhythm are two of our possible tasks for the project. And the ideas from the "Bubblegum Sequencer" inspires me to find a physical or digital grid that could read different music clips (instead a single beat) and interlock them to create a smooth music mashup. I look forward to the challenge.
Bubble Pop Electric - Proposal Summary

The "Bubble Pop Electric" is a fashion-forward, futuristic music suit that attempts to bridge the gap between the independent components of a musical performance. Inspired by Lady GaGa and other avant garde performers of contemporary music, the suit enhances the user's ability to not only control her music but also the theatrical components of the environment.
The suit is composed of three major components:
1. Bubble tokens: the plastic bubble tokens will each carry a resistor and LED that will be activated once it is attached to the body suit. They will initiate different music clips.
2. Stretchable body suit: The stretchable body suit will hold the activation surface for the bubble tokens and also provide the circuit for the LEDs. Also, it will read the user's movement and distort the playback accordingly. It will also carry bluetooth speakers on the shoulders.
3. Drum shoes: The shoes will be attached to vibration sensors that will detect the feet's movement and create drum beats.
Also, there will be a main computer acting as a receptor. It will have a software that will read, arrange, and play the input from the resistors. The exact direction for the programming aspect of the project is still in the process of discussion. However, we envision a system that will effectively sequence music clips (maybe create an array of Strings that represent certain music clips?).
The "Bubble Pop Electric" will be a fun, experimental device for musicians, performers, or any music friendly users who look forward to a more controlling, holistic performance equipment. It allows direct manipulation of music selection and body-aligned control, which will provide much freedom and an entertaining interface device.
References include "Musical B-boying: A Wearable Musical Instrument by Dancing." This TUI device attaches wireless accelerators to dancers' shoes and register different movements to different soundtracks to generate motion sensored music. It is a great inspiration to creating the stretchable body suit, which aims to read the body's movement and produce different musical effects.
And here is the scanned image of what I envision for the final look:

The design of the costume is open to technical and artistic improvements/changes. Our biggest concerns are the arrangement of bubbles-how to determine their sequence and how their placements are to be read. Also we have to determine the vibration sensors are to be attached to the circuits in the body suit or to carry bluetooth chip. Financial needs and affordability are integral parts to the project; therefore, we also need to discuss the most economical approach to production.
Monday, September 27, 2010
Lady Gaga - Poker Face by Applegirl (ver. I-Phone Apps)
I was first fascinated by how quick and easy it was for her to create background music using four iPhones. With the help of different applications, she had full control of beats and short music phrases that allowed her to make music that was polished and presentable- and also, GAGA. The iPhones simulated a piano and the drums. It also functioned as a mike that distorted and digitized the voice. Both touch and voice sensors were incorporated in the activity, and the user seemed comfortable with the setup that acted as a metaphor for a complete band.
The TUI project for my team will focus around creating a wearable device that will enable the user to make and manipulate music. We aim to create a TUI that is intuitive and easy to use and also that incorporates the entire body as an instrument, not just the tips of your finger. This video was a great inspiration for me and convinced me that an application that is even more aligned with your physical behaviors will create more room for musical creativity and freedom.
Saturday, September 25, 2010
Pranav Mistry: The thrilling potential of SixthSense technology
The "Sixth Sense" TUI has been developed at the MIT Media Lab under Pranav Mistry and Pattie Maes and was presented at 2009 Ted conferences. The major goal of this fascinating device is to bring the digital world closer to the physical world by getting rid of extra digital objects such as an iPhone or a computer and using the already available objects around you and reusing them as interfaces. The device takes form of a simple necklace consisted a mirror, camera, and projector and colored caps to go on your fingers. This way, the "Sixth Sense" allows you to manipulate both physical and digital information with your natural physical behaviors. Without having to carry a computer screen or any standard digital interfaces, the entire world around you becomes a desktop or an application screen. The Sixth Sense can perform various tasks: from creating digital art works on a random wall you find on the streets to dialing a call on your palm. You can even take a photo simply by gesturing a camera with your four fingers. The incredible flexibility to move between applications and even between various types of interfaces (computer screen to a piece of paper with printed texts) breaks the boundaries that we often find on the standard computer screen. This device allows total control over the vast pool of information by making them available anytime and anywhere.
Wednesday, September 22, 2010
Navigational Blocks Analysis
I used the two frameworks introduced in papers "Reality Based Interaction" and "TAC Paradigm" to analyze the "Navigational Blocks" TUI.
TAC Paradigm Analysis
The Navigational Blocks TUI is structured mainly based on the Token and Constraint (TAC) paradigm with elements of the Constructive Assemblies category. It consists of four wooden blocks, which play as both token and constraint, an active space-the permanent constraint platform, and the computer screen that displays the feedback to the query created by the two previous tools. The six sides of each wooden block is coupled with a topic and five related subtopics to represent the variables and information in the digital database.
The user, either by simply specifying a variable with a single block or by attaching two blocks and creating an "and" relationship between two variables, sends a query to be retrieved from the computer. In both cases, the TUI functions as a tangible query interface where the user manipulates the block(s) to control the feedback.
However, the two instances also show a difference. In the first case, the block performs as a token and the active space functions as the only constraint. In response to the block's variable, the display screen retrieves feedback. In the second case, computational building takes place. By presenting two blocks or two variables on the active space, the blocks become each others' constraint. This relationship is recognized through a haptic response: the blocks attach magnetically and build together if the query exists. If the two variables don't construct a valid query, they repel each other. Depending on user manipulation, the TUI can function as a tangible query interface with the structure of a typical TAC paradigm or a Constructive Assembly.
RBI Analysis
The Navigational Blocks TUI clearly embodies the concept of a Reality-Based Interaction (RBI) by eradicating the use of virtual icons and menus and creating a tangible search engine to navigate through digital information. The virtual world can be manipulated with physical tools and more direct user approach through this device. In attempting to bring together the virtual world and the physical world, certain themes of reality are emphasized and others are repressed.
The manipulation of the Navigational Blocks TUI emphasizes different kinds of human skills, especially that of environmental awareness. The user needs to be familiar with the function of a block object from picking it up to rotating and positioning it to the active space. Also, the development of the "self" is required, as the Block variable facing the user, not touching the active space, is to be read by the TUI.
The Blocks also ask for a learned understanding of naive physics and multiple behaviors. Once a Block has been placed on the active space, it can be coupled with another Block's variable depending on their relationship. For example, the "women" variable can be coupled with "early 18th century" variable to create a new variable representing the "women of early 18th century." This relationship is recognized based on the physics of magnetic attraction or repulsion between the Blocks. Once the relationship is established, the Blocks can mimic the function of a computer mouse and be slid back and forth to access the requested feedback.
This magnetic relationship is designed for novice users where reality is emphasized over efficiency and users need to discover the preexisting relationship through a trial-and-error process. However, some complex involvement is helpful to eliminate unnecessary trials. The users are asked to read and differentiate the "topic" from the"subtopics" presented in each block and make educated guesses to set up different queries. This function limits accessibility to people who can read and also recognize patterns.
The expressive power and versatility is subdued for the sake of simplicity as the display screen is limited to one query and one feedback at a time.This system also lacks continuous interaction as screen information is static until the user performs another action.
The Navigational Blocks TUI balances themes of reality and advanced functionality to create a search tool that is simple enough to approach but also complex enough to experiment with.
Tuesday, September 21, 2010
Subscribe to:
Posts (Atom)